
Converting an existing CM connected PC to a Gateway Device
- Selecting and installing a second Ethernet Card
- Connecting your network machines to your Gateway PC
- Assigning IP Addresses
- Setting the Gateway software
The same criteria that you used to select your first ethernet card should also be applied to your second one, with one subtle difference. I would recommend that your second card be a 10/100 card as this will provide more flexibilty in your choice of network hardware. There is very little monetary difference between 10MB and 100MB network equipment so if your budget can stretch that little bit, go for it. Note, however, this will not necessarily improve your Internet experience as your network will be choked by that 512k connection anyway. There is also a trade-off here as well. Most 10/100 cards tend to be PCI bus only so in order to use 100M networking you may need a spare PCI slot in your PC.
First you need to shutdown your PC, and this has to be the hardest part of the exercise. Well, it is if you are like me and run your PC all the time! Assuming you have got over that shock, remove the case, then remove the blanking plate adjacent to the slot that you are going to insert your new card. Ensure it is firmly in and secure it with a retaining screw if necessary. Replace the lid and then connect an RJ45 cable between your new card and your network device - we'll assume it is a hub, but it could be a switch. If you don't have a hub or a switch and just wish to connect another single PC, then you will need an RJ45 cross-over cable between them instead. Restart your PC and depending on your OS, your card will either be automatically installed and the correct drivers loaded, or, you will need to manually load the relevant files to support your card.
Installation under Windows
If you network card is Plug and Play, and your PC BIOS supports PNP, then Windows will automatically start the hardware installation wizard when the machine is booted. In this case, it is just a matter of following the prompts and ensuring that you have the necessary driver disk inserted into the appropriate drive. Windows already has a number of network card drivers included in it's list of supported hardware but it is always beneficial to use the most up to date drivers, and these may well be contained on the disks that came with your card.
In the case where your card is not PNP, or you are using NT3.51 or NT4, then you will need to run the install hardware wizard manually from within Control Panel by double clicking the 'Add New Hardware' icon. Alternatively, your card may come with an install or setup program that will install the necessary driver files.
Installation under Linux
Over the years Linux has had an uneasy relationship with Plug and Play devices, and generally the PNP function of any card should be disabled if possible. Newer Linux Kernels, however, may not require this and it may be worth consulting the appropriate help files on your Linux system for the definitive answer as to whether you do need to disable PNP.
Traditionally, network adapter support within Linux is performed by the use of modules that are loaded as part of the kernel. Older Linux kernels required that the kernel itself be edited and recompiled in order to add new hardware modules, but kernels above version 2.0 allow for the manual adding and installation of modules without this unnecessary chore. There are a number of commands available within Linux to manipulate modules and, in addition, most Linux variants come with system utilities that allow installation of new modules without the need to hack the system files directly. If you have the inclination, I would suggest that you investigate the 'manual' method of installing additional modules as this will help in your understanding of the way your Linux system is held together.
Connecting your Devices to your Gateway PC
If you have not already connected your PC to the Cable Modem, then use a straight RJ45 Cat5 Cable only to connect between the two, as you would have done previously. Any other cable will either not work or may cause problems. The Link LED on your Cable Modem may or may not come on when the connection is made as this is dependant on your card. Netgear cards will show a Link light whatever the state of the tcp/ip settings of the card, whereas 3Com cards may not actually show any link indication until the tcp/ip properties have been set through the DHCP negotiation.
The devices you add to your LAN will require some sort of physical connection to the internal NIC of your gateway, be it directly, via a hub, or thru' a 10base2 daisy-chain if you intend to use this network type. For RJ45 connections then you will either need a straight Cat5 cable if your Gateway connects to your LAN via a hub or a switch, or a cross-over Cat5 cable if you just have a single PC connected to your Gateway.
On your Gateway, you will have two network card instances with each one having an independent IP address assignment. Your Cable Modem facing NIC will need to be set to automatically obtain an IP address, so your tcp/ip settings will need to be set to reflect this. If your are retaining the existing CM connected interface, then this should require no changes to the original configuration.
Your LAN facing NIC, however, will need to an have an address manually set in order to function with the rest of the machines on your network. Assuming you already have an IP address range in use on your network, then you can leave these settings as they are. However, it is common practice to set LAN gateways with either .1 or .254 as their address, as it then leaves the whole of the intervening numbers for your other hosts.
If you are not already doing so, then you should set your LAN IP addresses to one of the designated privately assigned number ranges, as this will avoid routing issues with any host on the Internet that just happens to have your IP addresses assigned to them.
The address ranges designated as privately assigned are as shown in the following table. Note that it is highly unlikely that a home network will require thousands or millions of addreses, but it is still possible to use the Class A and B address ranges for your internal network without any penalty. It is very common for the 192.168 address range to be used within a home network as it is very easy to manage.
| Network | Class | Available address Range | Available number of Hosts |
| 10.0.0.0 | A | 10.0.0.1 -> 10.255.255.254 | Millions;-) |
| 172.16.0.0 | B | 172.16.0.1 -> 172.31.255.254 | Thousands;-) |
| 192.168.0.0 | C | 192.168.0.1 -> 192.168.255.254 | 254 per network |
For example, if the network number is 192.168.0.0, then this will allow us to use the numbers 192.168.0.1 through 193.168.0.254 for our hosts. If 254 is used as the gateway's address, then each of the other machines can be allocated addresses such as 192.168.0.10, 192.168.0.20, 192.168.0.30, etc.. When setting these other machines, you need to specify the address of your gateway as the Default Router. This tells the PC's IP stack to use your gateway as the route for all your non-local traffic.
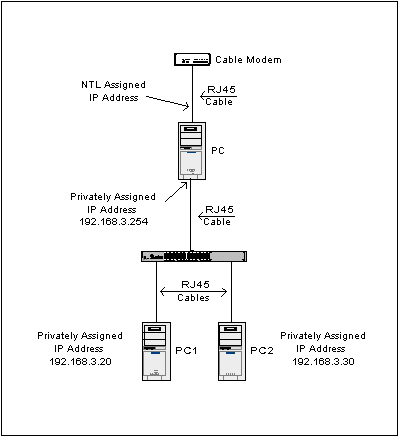
Ultimately, you will have something that, logically, looks like the following network diagram, with each of the private PCs being connected to the same Hub via RJ45 cables. Each PC also has a static IP address allocation that is derived from one of the private address ranges. Notice that the first three parts of the private addresses are the same. Both PC1 and PC2 have been set-up with 192.168.3.254 as their default gateway, i.e., they will use this address to connect to other networks. Note, however, without some NAT and routing software this setup will not actually work at present!
In order for us to use the network we have just built we need to look at installation of some gateway or proxy software
There are two main requirements for your Gateway's software. It must provide NAT and it really ought to have some sort of firewall in place. If your Cable connected PC already had firewall software installed then you should be able to re-use this albeit with some minor modifications to allow your LAN machines access to the outside world. As some added value it may well be worth considering some Proxy software as well, although if you are using your gateway machine as a workstation then this could cause some performance issues.
All Copyrights and Trademarks ACK'd. Not to do so would be a SYN!